Note that you cannot send the image pasted on the Address Book entry if the target CLIÉ™ handheld runs on Palm OS® 4.x or lower, or the target is not a Sony Palm OS® device.
| Sending an Address Book entry |  |
Sending Address Book entries from CLIÉ™ handheld
Regardless of the other Palm OS® device, you can send the Address Book entry if the image is not pasted.
Exchanging business card
You can choose and define an Address Book entry as a business card, and send it to other CLIÉ™ handhelds via the infrared communications port.
| 1 |
Prepare the receiving and beaming CLIÉ™ handhelds.
Make sure that the Beam Receive is set to on in the Preferences dialog box.
Refer to the Handbook provided with your CLIÉ™ handheld for details.
|
||||||||||||
|---|---|---|---|---|---|---|---|---|---|---|---|---|---|
| 2 |
Align the infrared communications ports of the CLIÉ™ handhelds.
For best results, the sending and the receiving CLIÉ™ handhelds should be 4 to 8 inches (approximately 10 to 20 centimeters) apart.
|
||||||||||||
| 3 |
Tap Menu
The Beam Business Card dialog box is displayed.
|
||||||||||||
| 4 |
Select the version of vCard and the image is pasted or not.
"With Image/Without Image" is only displayed when you beam the Address Book entry with an image pasted.
|
||||||||||||
| 5 |
Tap Send.
Sending starts. Be sure not to move the CLIÉ™ handhelds until sending finishes.
When sending completes, the Address Book entry is displayed on the target CLIÉ™ handheld.
|
Note
You cannot send the Free Notes item pasted on the Address Book entry.
Beaming all the Address entries in the category
| 1 |
Prepare the receiving and beaming CLIÉ™ handhelds.
Make sure that the Beam Receive is set to on in the Preferences dialog box.
Refer to the Handbook provided with your CLIÉ™ handheld for details.
|
||||||
|---|---|---|---|---|---|---|---|
| 2 |
Align the infrared communications ports of the CLIÉ™ handhelds.
For best results, the sending and the receiving CLIÉ™ handhelds should be 4 to 8 inches (approximately 10 to 20 centimeters) apart.
|
||||||
| 3 |
Tap Menu
The Beam Address dialog box is displayed.
|
||||||
| 4 |
Select the version of vCard.
|
||||||
| 5 |
Tap Send.
Beaming starts. Be sure not to move the CLIÉ™ handhelds until beaming finishes.
When beaming completes, the Address Book entries are displayed on the target CLIÉ™ handheld.
|
Beaming the current Address Book entry
| 1 |
Prepare the receiving and beaming CLIÉ™ handhelds.
Make sure that the Beam Receive is set to on in the Preferences dialog box.
Refer to the Handbook provided with your CLIÉ™ handheld for details.
|
||||||||||||
|---|---|---|---|---|---|---|---|---|---|---|---|---|---|
| 2 |
Align the infrared communications ports of the CLIÉ™ handhelds.
For best results, the sending and the receiving CLIÉ™ handhelds should be 4 to 8 inches (approximately 10 to 20 centimeters) apart.
|
||||||||||||
| 3 |
On the Address Book screen, tap the Address Book entry that you want to send.
|
||||||||||||
| 4 |
Tap
The Beam Address dialog box is displayed.
|
||||||||||||
| 5 |
Select the version of vCard and the image is pasted or not.
"With Image/Without Image" is only displayed when you beam the Address Book entry with an image pasted.
|
||||||||||||
| 6 |
Tap Send.
Beaming starts. Be sure not to move the CLIÉ™ handhelds until beaming finishes.
When beaming completes, the Address Book entry is displayed on the target CLIÉ™ handheld.
|
Sending the Address Book entry using the Bluetooth® wireless technology
(for models containing the Bluetooth® wireless technology only)
You can send the Address Book entry via Bluetooth® wireless technology to or from another BIP* compatible device such as a digital still camera or a computer.
Using the BIP wireless technology, you can automatically convert the image to the proper size for a file transfer via Bluetooth® wireless technology.
It is a useful way to send images when there is not enough memory space available on the receiving device.
For the operation of the PDA such as CLIÉ™ handheld using the Bluetooth® wireless technology, refer to the operating instructions of each PDA.
Notes
| • |
The BIP function can only be used to transfer files using the Bluetooth® wireless technology. |
||
|---|---|---|---|
| • |
On the CLIÉ™ handheld with the BIP* function, the receiving transfer speed and file size are optimized by reducing the image size lower than 640 x 480 pixels. See "Sending files using Bluetooth® wireless technology" if you want to transfer still images higher than 640 x 480 pixels to another CLIÉ™ handheld.
|
Sending all the Address entries in the category using the Bluetooth® wireless technology
(for models containing the Bluetooth® wireless technology only)
| 1 |
Prepare the receiving and sending CLIÉ™ handhelds.
Make sure that Bluetooth® wireless technology is Enabled in the Preferences dialog box.
Refer to the Handbook provided with your CLIÉ™ handheld for details.
|
||||||
|---|---|---|---|---|---|---|---|
| 2 |
Tap Menu
The Beam Address dialog box is displayed.
|
||||||
| 3 |
Select the version of vCard.
|
||||||
| 4 |
Tap Send.
Sending starts. Be sure not to move the CLIÉ™ handhelds until sending finishes.
When sending completes, the Address Book entries are displayed on the target CLIÉ™ handheld.
|
Sending the current Address Book entry using the Bluetooth® wireless technology
(for models containing the Bluetooth® wireless technology only)
| 1 |
Prepare the receiving and sending CLIÉ™ handhelds.
Make sure that Bluetooth® wireless technology is Enabled in the Preferences dialog box.
Refer to the Handbook provided with your CLIÉ™ handheld for details.
|
||||||||||||
|---|---|---|---|---|---|---|---|---|---|---|---|---|---|
| 2 |
On the Address Book screen, tap the Address Book entry that you want to send.
|
||||||||||||
| 3 |
Tap
The Send Address dialog box is displayed.
|
||||||||||||
| 4 |
Select the version of vCard and the image is pasted or not.
"With Image/Without Image" is only displayed when you send the Address Book entry with an image pasted.
|
||||||||||||
| 5 |
Tap Send.
Sending starts. Be sure not to move the CLIÉ™ handhelds until sending finishes.
When sending completes, the Address Book entry is displayed on the target PDA such as CLIÉ™ handheld using the Bluetooth® wireless technology.
|
Exporting the Address Book entry on "Memory Stick™" media
You can copy (export) the Address Book entry on your CLIÉ™ handheld onto "Memory Stick™" media.
| 1 |
On the Address Book screen, tap the Address Book entry that you want to export.
The Address View screen is displayed.
|
||||||||||||
|---|---|---|---|---|---|---|---|---|---|---|---|---|---|
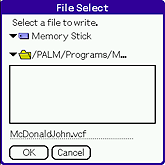
| 2 |
Tap
The File Select dialog box is displayed.
|
||||||||||||
| 3 |
Tap the file that you want to export.
 |
||||||||||||
| 4 |
Ensure that the "Memory Stick™" media is inserted and then select the storage folder.
|
||||||||||||
| 5 |
Tap OK.
The Export Address dialog box is displayed.
|
||||||||||||
| 6 |
Select the version of vCard and the image is pasted or not.
"With Image/Without Image" is only displayed when you send the Address Book entry with an image pasted.
|
||||||||||||
| 7 |
Tap OK.
|
Importing the Address Book entry from “Memory Stick™” media
You can copy (import) the Address Book entry on “Memory Stick™” media onto your CLIÉ™ handheld.
| 1 |
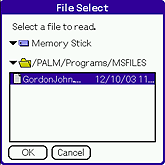
On the Address Book screen, tap
The File Select screen is displayed.
 |
|---|---|
| 2 |
Ensure that the "Memory Stick™" media is inserted and then select the folder where the vCard-format file is stored.
|
| 3 |
Tap the file that you want to import.
|
| 4 |
Tap OK.
|
If you import the Address Book entries from “Memory Stick™” media, the entries on “Memory Stick™” media are not deleted.